

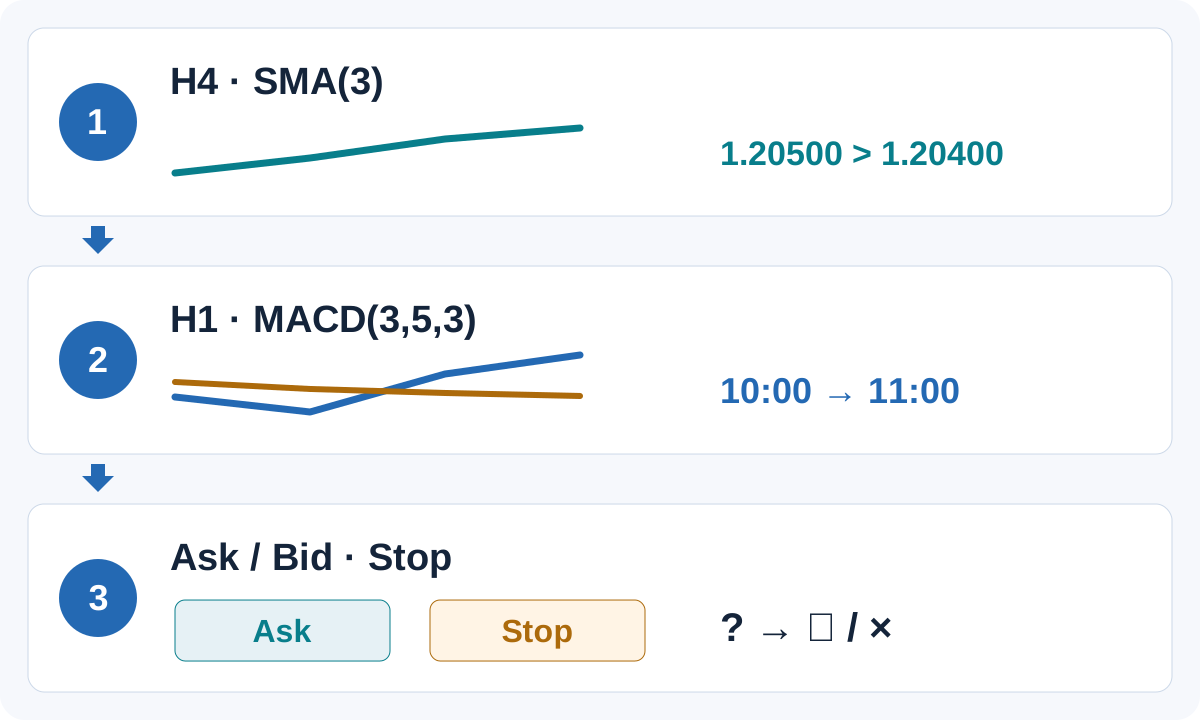
Combining trend indicators starts with assigning each tool a job. A direction filter, a strength check and an entry trigger answer different questions. Adding another display is useful only when it changes a decision for a reason you can explain and test.
This guide builds that decision process, including disagreement, missing confirmation and a reproducible timed example. For trend identification, use the trend-reading guide; for calculations and platform differences, use the comparison of trend indicators. Here the focus is how observations become rules.
1. Assign roles before combining settings
One indicator may describe direction without answering whether movement is orderly, a pullback has ended or an entry is affordable. Separate those questions. Price structure and nearby levels provide context; they do not become reliable barriers because an indicator agrees with them.
| Decision layer | Example observation | Rule still required |
|---|---|---|
| Context and direction | Price above a rising average; previously identified support and resistance. | Which side is eligible, which timeframe applies and when the context fails. |
| Strength or momentum | ADX with its DI relationship, or MACD relative to its signal. | A precise threshold or comparison, not an impression of a strong chart. |
| Entry and invalidation | A completed close beyond a fixed reference. | Timing, expiry, failed conditions and the next executable quote. |
| Exposure and exit | A predefined stop reference, volume limit and exit event. | Position size, costs, broker constraints and management of existing orders. |
Scroll tables horizontally on a narrow screen.
2. Distinguish confirmation from repeated information
A moving-average crossover and MACD above zero can describe closely related relationships between averages. Using both may simply count similar price information twice. ADX asks a different question about directional movement, but it also comes from price data; it is not statistically independent evidence.
Write a reason for every additional condition. Then compare the complete method with and without it on the same data, costs and risk assumptions. Record eligible events, rejected events, delays, drawdown and net results. Fewer trades or a smoother historical chart alone does not establish improvement.
Choose either mandatory gates or an explicitly defined score. Do not alternate between them after seeing the outcome. A majority vote cannot override a mandatory risk limit, and counting correlated signals does not turn their count into a probability of success.
3. Combine an average with ADX for distinct questions
An illustrative long-side filter could require a completed close above a rising MA, ADX above a chosen level and +DI above −DI. The MA describes direction relative to a smoothed reference; ADX describes directional strength; the DI comparison checks its directional relationship. An entry trigger must still be defined separately.
For example, assume ADX(14) = 27, +DI = 24, −DI = 16 and a candidate threshold of 25. Those readings pass the proposed strength and DI checks. If instead +DI = 14, −DI = 26 while ADX remains 27, the long filter fails its DI condition. These are assumed snapshots, not values calculated from the later example.
Neither 14 nor 25 is an optimum established here. High ADX can persist during a transition; low ADX can occur before a move develops. A filter may remove losses and winners or add delay. Review its contribution through the ADX strategy's separate rule framework and your own controlled tests.
4. Combine an average with MACD without counting votes
A possible division is a slower context filter and a faster momentum event. Specify whether MACD must exceed zero, exceed its signal or cross that signal on the latest completed bar. A state and a fresh crossing are different rules. Agreement can arrive after much of a price move has already occurred.
In standard MT4, MACD's main series is drawn as bars; those bars are not automatically main minus signal. Name both series in the rule. The example below uses an SMA signal explicitly and short teaching periods, rather than silently substituting a different platform's display or defaults.
5. Align completed observations across timeframes
Choose a decision clock first. At each completed H1 bar, use only higher-timeframe observations already completed and available at that moment. The H4 candle containing that H1 bar may still be forming. Its final close cannot be used earlier merely because a historical chart now shows it.
In the synthetic example, all times are one broker's server time, H4 bars begin at 00:00, 04:00, 08:00, 12:00, and there are no gaps. At 11:00, the latest closed H4 bar spans 04:00–08:00. The bar spanning 08:00–12:00 is unavailable as a completed observation. Real feeds require checks for their own session boundaries, missing bars and data readiness.
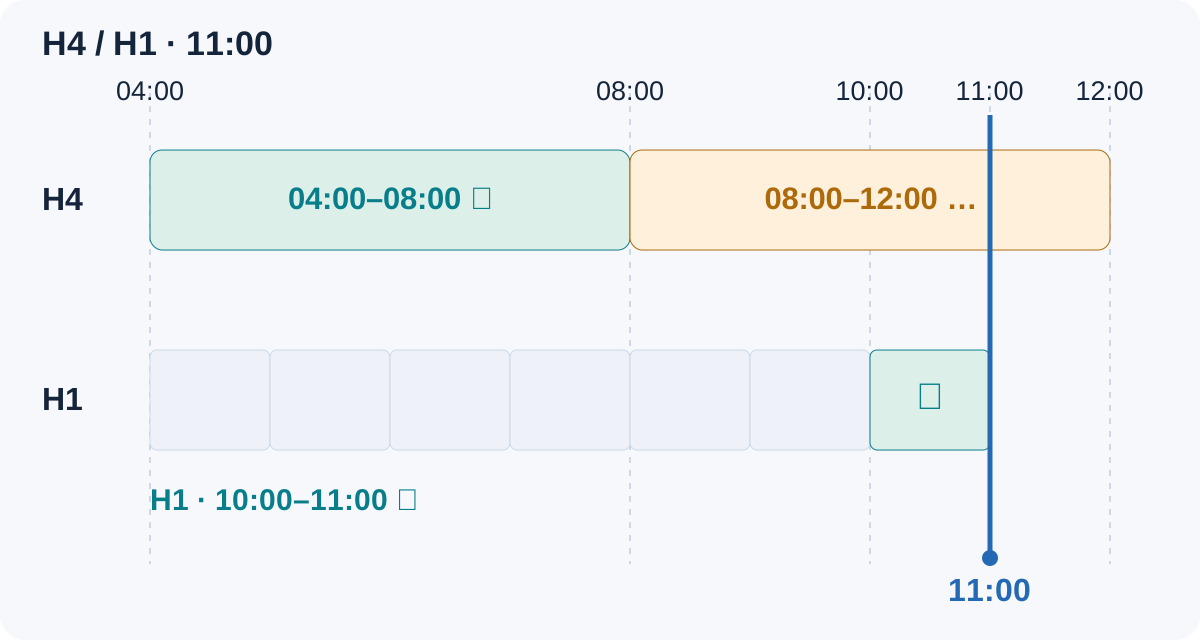
In MT4 timeseries, index 0 denotes the forming bar and 1 the latest completed bar once the next begins and data are available. For historical multi-timeframe replay, map actual bar times and verify completion at each decision time. A bar containing a timestamp is not necessarily a completed bar. Do not reuse today's shift for an earlier decision.
6. A checkable MA and MACD decision example
This is synthetic EURUSD Bid-close arithmetic, not a backtest, price forecast or trading recommendation. No fills or returns are simulated. Short periods make initialization visible: H4 and H1 use SMA(3); H1 MACD uses EMA(3) − EMA(5) with a 3-value SMA signal. Chart displacement is zero. Parameters and price references are illustrative.
Establish the available context
The four completed H4 closes ending at 20:00 on the previous day, then 00:00, 04:00, 08:00, are 1.20200, 1.20400, 1.20300, 1.20500. The previous SMA is 1.20300; the latest is 1.20400. Thus the latest H4 close is above a rising average. Freeze this context until another H4 bar completes.
Reproduce the lower-timeframe inputs
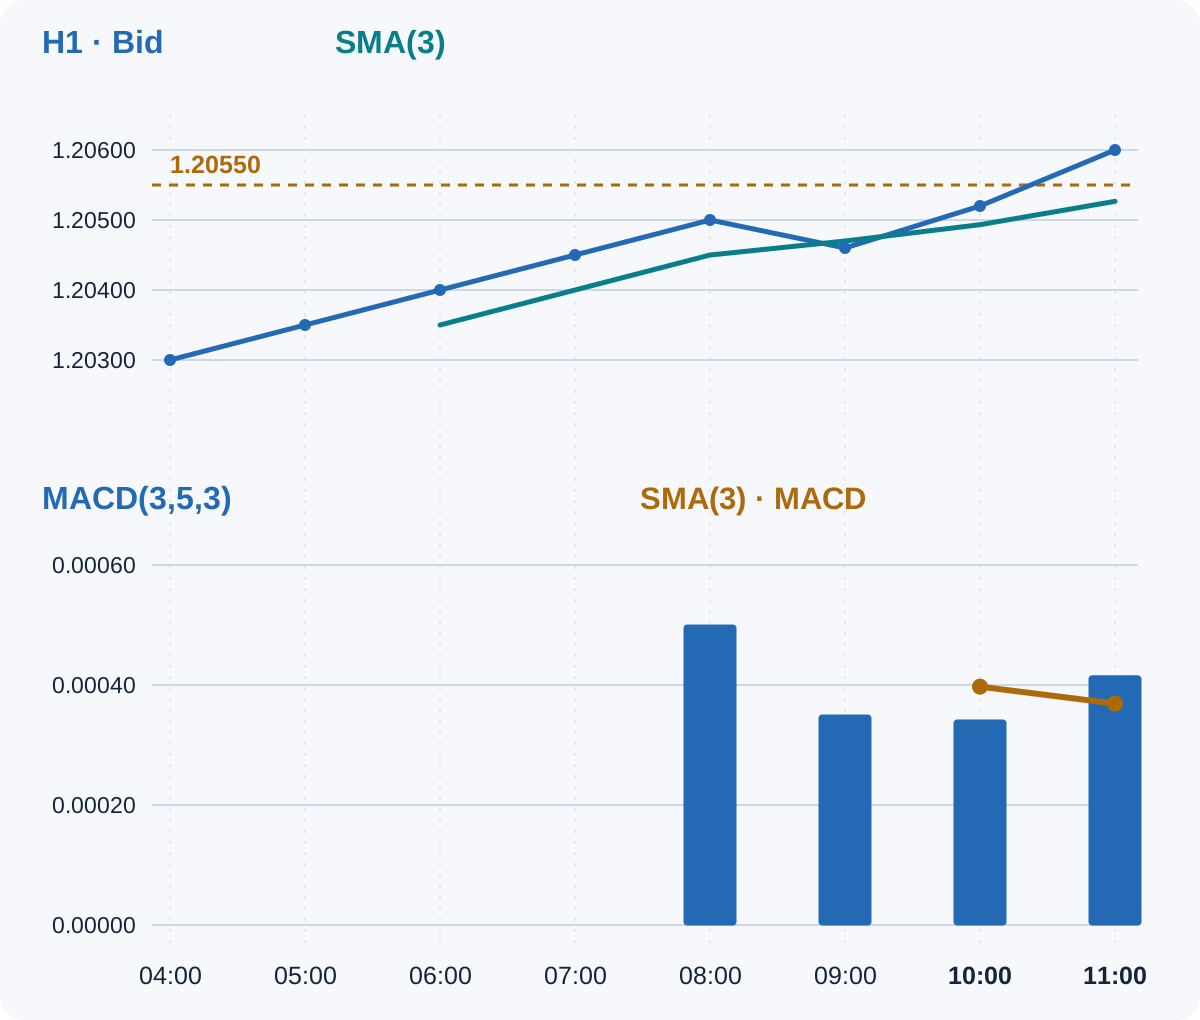
The following H1 bars are labeled by closing time. Seed EMA 3 with the mean of the first three closes at 06:00; seed EMA 5 with the first five at 08:00. Subsequently use EMA = α × close + (1 − α) × previous EMA, with α = 2 / (period + 1). This stated seed is part of the example, not a promise of matching a terminal with longer history.
| H1 close time | Bid close | Availability note |
|---|---|---|
04:00 | 1.20300 | First input. |
05:00 | 1.20350 | Initialization continues. |
06:00 | 1.20400 | Fast EMA seed: 1.20350. |
07:00 | 1.20450 | Fast EMA updates; slow seed not yet available. |
08:00 | 1.20500 | Slow EMA seed: 1.20400; first MACD main value. |
09:00 | 1.20460 | Only two main values; signal SMA still unavailable. |
10:00 | 1.20520 | First complete signal SMA; main below signal. |
11:00 | 1.20600 | Main crosses above signal on a completed bar. |
Using unrounded intermediate values, H1 SMA at 10:00 is 1.20493333 and at 11:00 is 1.20526667, rounded here. MACD main and signal at 10:00 are 0.00034167 and 0.00039722; at 11:00 they are 0.00041528 and 0.00036898. Main is positive at both times, but only the later observation is above its signal.
Apply a rule written before the event
For teaching, fix a breakout reference of 1.20550 and an invalidation reference of 1.20400 before evaluating the last two bars. These are declared inputs, not swing levels retrospectively discovered in this close-only dataset. Actual structural levels require a separately documented method.
- Context: latest completed H4 close above its rising SMA. This passes at both decision times.
- Location: completed H1 close above its rising SMA and strictly above the fixed breakout reference. This fails the breakout comparison at
10:00and passes at11:00. - Fresh momentum event: main must be positive, with
main − signal ≤ 0on the previous completed H1 bar andmain − signal > 0on the latest. At11:00, that crossing is observable; earlier missing signal values cannot be treated as zero. - Result: all required observations agree at
11:00. This creates eligibility for a possible long, not a fill at that historical Bid close.
7. Handle agreement, conflict and missing confirmation
The example contains three useful states. At 09:00, signal initialization is incomplete: no confirmation is available. At 10:00, the H4 filter is positive but MACD is below signal and price has not cleared the reference: the setup is rejected. At 11:00, the defined gates agree: proceed to execution and risk checks.
“Rejected” does not mean “sell.” A long-only rule's failure creates no short rule. If a mandatory observation conflicts or is unavailable, log the reason and wait for a new eligible event. Do not weaken a threshold, switch timeframes or add a reassuring indicator to rescue the current idea.
In a range, price may repeatedly cross its average and fixed levels while momentum signals alternate. Define range exclusions before testing, if using them. Skipping such periods has opportunity costs too. Support, resistance and confirmed structure should be identified with information available then; see the market-structure guide for that separate process.
8. Separate eligibility, execution, invalidation and exit
To turn the teaching example into a test specification, permit an entry only at the first tradable quote of the next H1 bar after qualification. If required data, spread, volume, margin or broker stop rules fail at that quote, record a skip. Do not carry eligibility forward indefinitely. A buy uses Ask; its price need not equal the preceding Bid close.
Use the declared 1.20400 reference as the proposed initial protective stop only if it is valid below the actual buy price under the broker's rules. Size from the actual entry-to-stop distance, contract specifications and a predetermined cash-risk budget, including cost allowances. If no valid volume fits, skip. The risk-management guide covers sizing and correlated exposure.
Before entry, cancel the setup if a newly completed H4 observation fails the context rule or a completed H1 close is at or below the invalidation reference. After entry, this illustrative specification exits on a protective stop or requests closure after an H1 close at or below its SMA, whichever event occurs first. It uses no profit target. A close-based exit request executes at an available quote; a stop can suffer slippage or gaps.
Allow no stacking and no duplicate order for the same event. After exit, require a fresh qualifying crossing. For an EA, the indicator value, the eligibility rule, the order request and the broker's confirmed position are separate states. Reconcile existing orders and log rejected requests; a repeated tick must not create another copy of the same intended trade.
9. Give SAR an optional management role
Parabolic SAR can be studied as an alternative trailing reference after an entry, rather than another vote for entering. Specify when its completed value is read, how a stop amendment is validated and whether a long stop may only tighten. A plotted dot is not an accepted broker order.
Do not add SAR retrospectively only to losing examples. Compare it as a separately frozen exit variant against the original exit, with the same entries and risk assumptions. Ranges can cause frequent flips; reversing the position at every flip would introduce an additional strategy, not merely a different stop.
10. Test the contribution of each condition
Freeze the data source, initialization, observation times, entry, expiry, exit and costs before comparing variants. Start with a simple baseline, then change one condition at a time. Keep a record of every tried variant, not just the final winner. Repeated searches across periods, thresholds, pairs and exclusions increase the risk of fitting historical accidents.
Separate development history from a reserved later evaluation period. Once its results influence a revision, that period is no longer untouched evidence. Examine nearby settings and different market conditions, including ranges. Our optimization and overfitting guide explains the broader validation workflow.
A closed-bar entry does not make an open-price-only test sufficient when stops or other rules can act inside a bar. Use data and modeling that cover the actual events. Include spread, commission, swaps and execution assumptions; the standard MT4 tester's modeled ticks are not a recorded live tick stream. Follow a documented backtesting process.
A historical holdout or software “forward” segment is still historical evaluation. Demo forward observation tests new incoming data and operational behavior; it does not reproduce every live execution condition. If moving to live observation, retain predefined exposure and stopping limits. No stage guarantees future profitability.
11. A practical checklist before accepting a signal
- Can you name the distinct job of every indicator and the price structure being used?
- Are symbol, feed, periods, price inputs, smoothing and initialization recorded?
- Was each value completed and available at the actual decision time on its own timeframe?
- Are comparisons, crossing conditions, missing-data handling and expiry unambiguous?
- Are entry, cancellation, protective stop and exit separate, executable rules?
- Do costs, position size, total exposure and broker constraints pass before an order is sent?
- Has the extra condition earned its place in a controlled comparison, with a preserved evaluation period and forward observations?
12. Questions about combining trend indicators
How many trend indicators should I combine?
There is no universal count. Start with the smallest set that answers your defined questions. Retain an extra condition only when you can explain and evaluate its contribution, including the events it delays or removes.
Are MA and MACD independent confirmations?
No. Both transform prices, and MACD itself compares averages. They can serve distinct operational roles, but agreement does not establish independent evidence or a probability of success.
Should I trade when most indicators agree?
Only if a fully specified method uses that scoring rule and passes its mandatory gates. A majority cannot replace missing required data, a valid stop, acceptable costs or an exposure limit.
Can I use the current H4 value for an H1 signal?
You can design a rule around a changing H4 value, but that is a different method requiring intrabar reconstruction and testing. The closed-bar example here uses only the H4 observation already completed at the H1 decision time.
Does no confirmation mean the opposite trade is valid?
No. A missing or failed long condition means the long is ineligible under that rule. A short needs its own conditions, execution logic and risk checks.
Can an EA automate this process?
It can automate explicit rules, not supply evidence that they work. Data alignment, initialization, one-event handling, order ownership, broker constraints and forward monitoring still require implementation and verification.
13. Keep a small, auditable decision process
A useful combination has identifiable roles, a shared decision clock and a predetermined response to conflict. The worked example demonstrates availability, arithmetic and eligibility only. Use the official MQL4 timeseries documentation when checking platform indexing, then validate the complete trading specification separately.
Forex and leveraged trading involve substantial risk. Educational examples are not investment advice. Simulated or past results do not guarantee future performance.