

An order block starts with a choice: which completed candle supplies the zone, which prices define its edges and when does that classification become available? This guide follows eight fictional M15 Bid bars through two boundary conventions, different first returns and a later failure. Its observations explain how to specify and test a zone; they do not create an entry instruction.
1. What an order-block label actually describes
In price-action analysis, an order block commonly identifies an opposing candle or group of candles before a directional move. Different educators use different source-selection and displacement conventions. The label therefore needs a stated detector before two charts or studies can be compared.
A retail OHLC candle does not reveal who traded, which institution holds an exposure or whether an unfilled bank order remains. In this guide, the shaded area is a reproducible price hypothesis. Its later recognition and returns are observable; an institutional explanation remains an inference.
2. Separate the source candle from its boundary convention
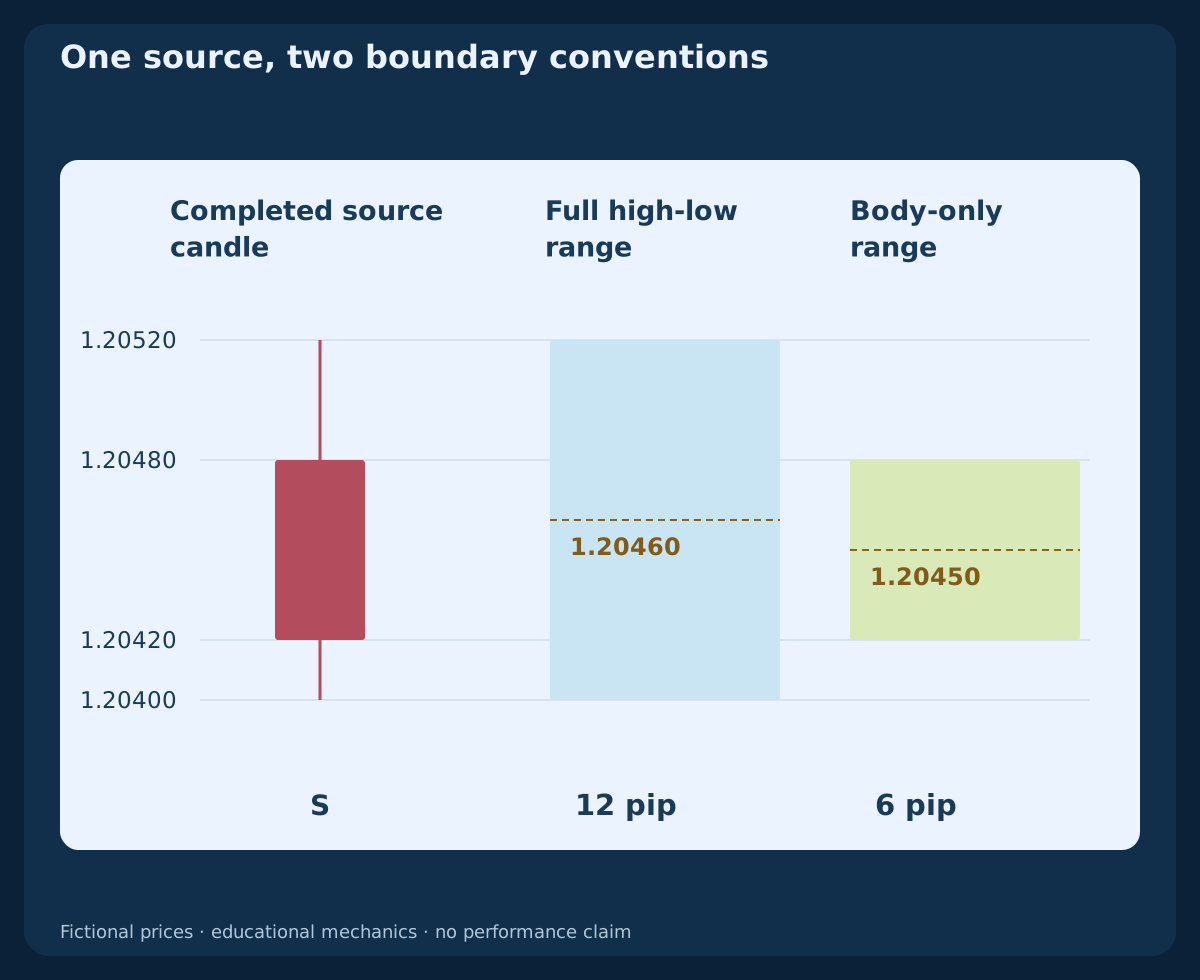
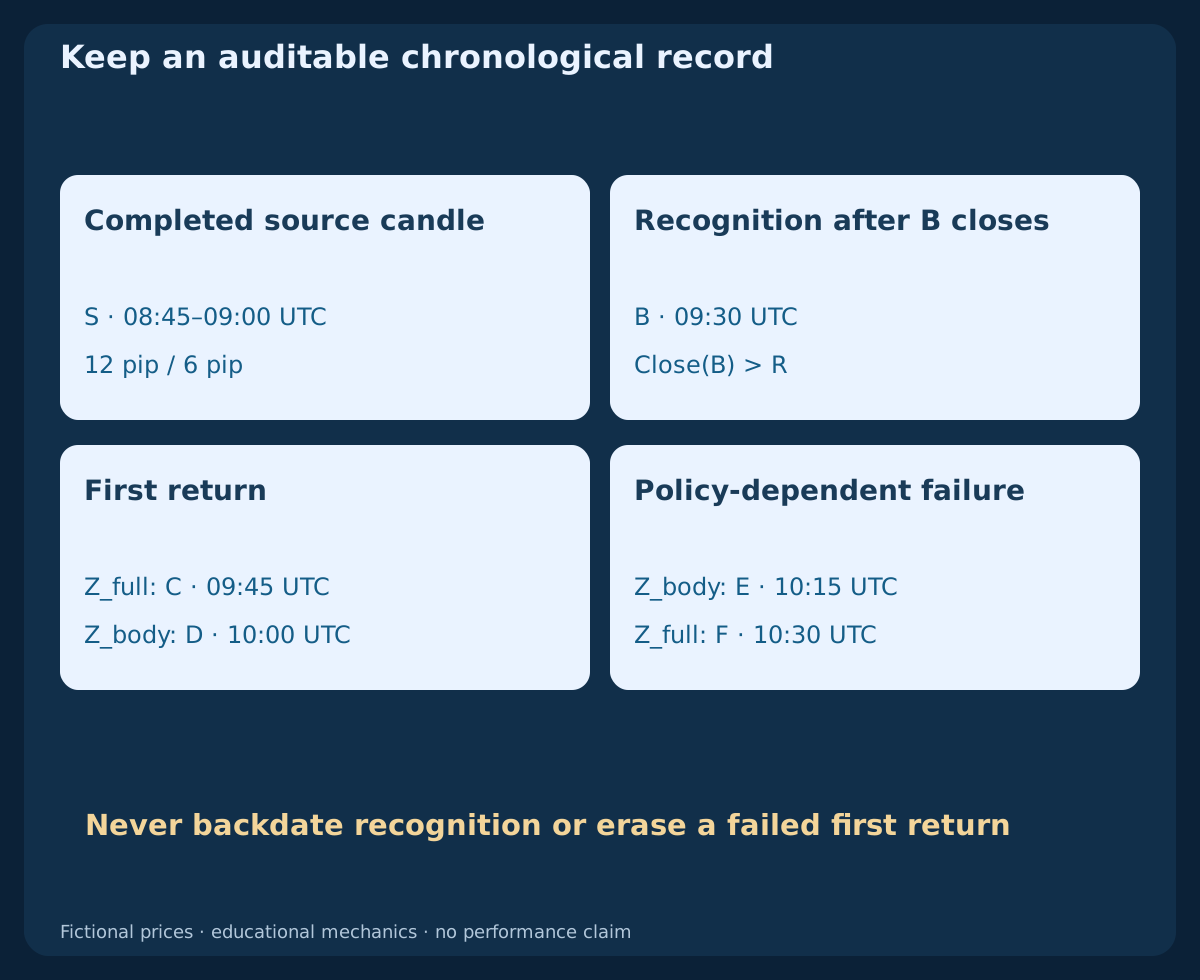
Our bearish source S has Open=1.20480; High=1.20520; Low=1.20400; Close=1.20420. Its full high-low zone is [1.20400,1.20520], or 12 pip. Its body-only zone is [1.20420,1.20480], or 6 pip. Both use the same candle; neither boundary can be silently substituted for the other.
The full-range midpoint is 1.20460, while the body midpoint is 1.20450. A midpoint is another declared level, not an automatic entry or a universally preferred order-block price. A zone made from several candles would require a separate rule for selecting and combining them.
3. Choose the source before inspecting the winning return
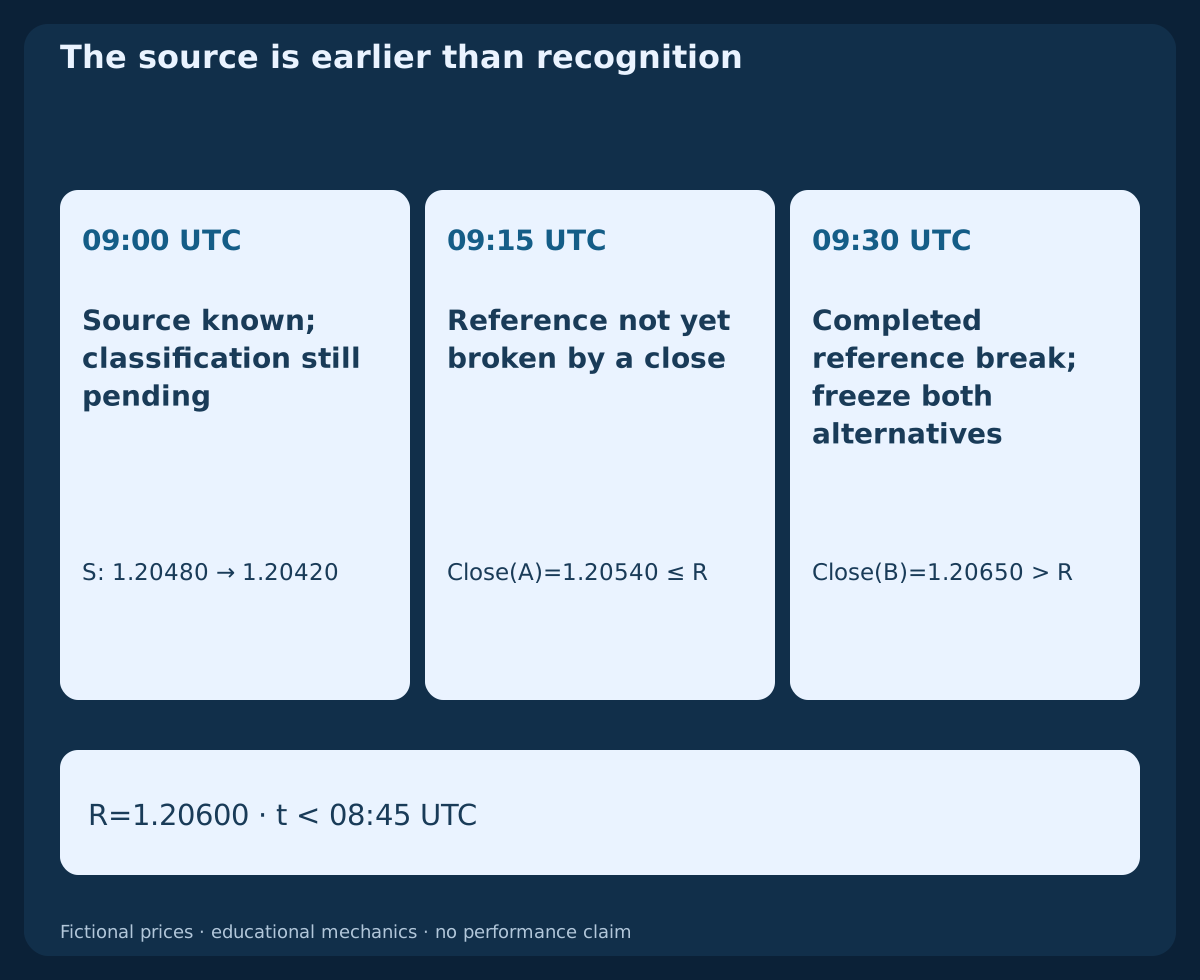
For the fictional sequence, the observation convention chooses S as the last bearish candle before the two bullish advances A and B. A reference R=1.20600 is explicitly assumed known before 08:45 UTC; the supplied eight bars do not estimate that earlier reference.
This is a small classification example, not a new complete strategy or a replacement for the existing H1 Order Block method. Do not scan backwards after a profitable rebound to select whichever source gives the neatest stop. A different source search, doji policy or multi-candle cluster changes the detector and its eligible dates.
4. Timestamp recognition at the completed break
S finishes at 09:00 UTC, but its later classification is not available then. A finishes at 09:15 UTC with Close(A)=1.20540≤R. B finishes at 09:30 UTC with Close(B)=1.20650>R. Under this illustration's declared close rule, the two alternative zones become recognised at B's close.
A chart may draw the rectangle back to S to show its origin. Its observation log must still retain recognised=09:30 UTC. A price interaction during A or B is part of formation, not a later retest of an already recognised zone. Future candles must not grant earlier entry permission.
5. Define displacement without adding hindsight filters
A larger directional move can be described through a body threshold, a previously known range or a completed reference break. The relevant threshold and comparison window must be fixed before outcomes are examined. This fixture uses only its explicitly stated source, two advances and reference break to explain timing; it does not estimate an optimal threshold.
An order block and a fair value gap are different geometric objects. Here Low(B)=1.20510<High(S)=1.20520, so S, A and B do not form a bullish three-candle non-overlap. Adding an FVG requirement would select a different sample. When both labels come from one move, they also share information rather than supplying automatically independent confirmation.
6. Find the first return separately for each zone
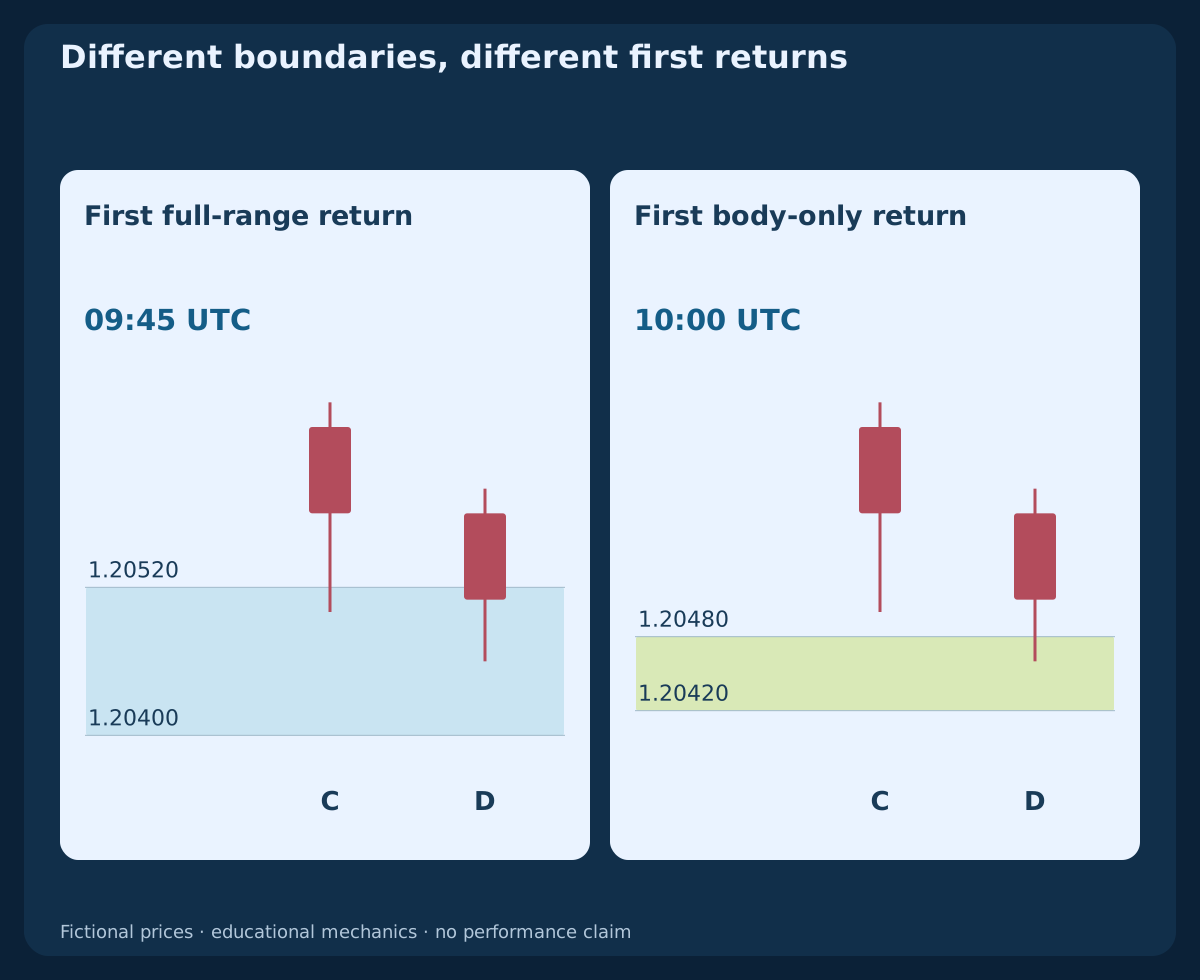
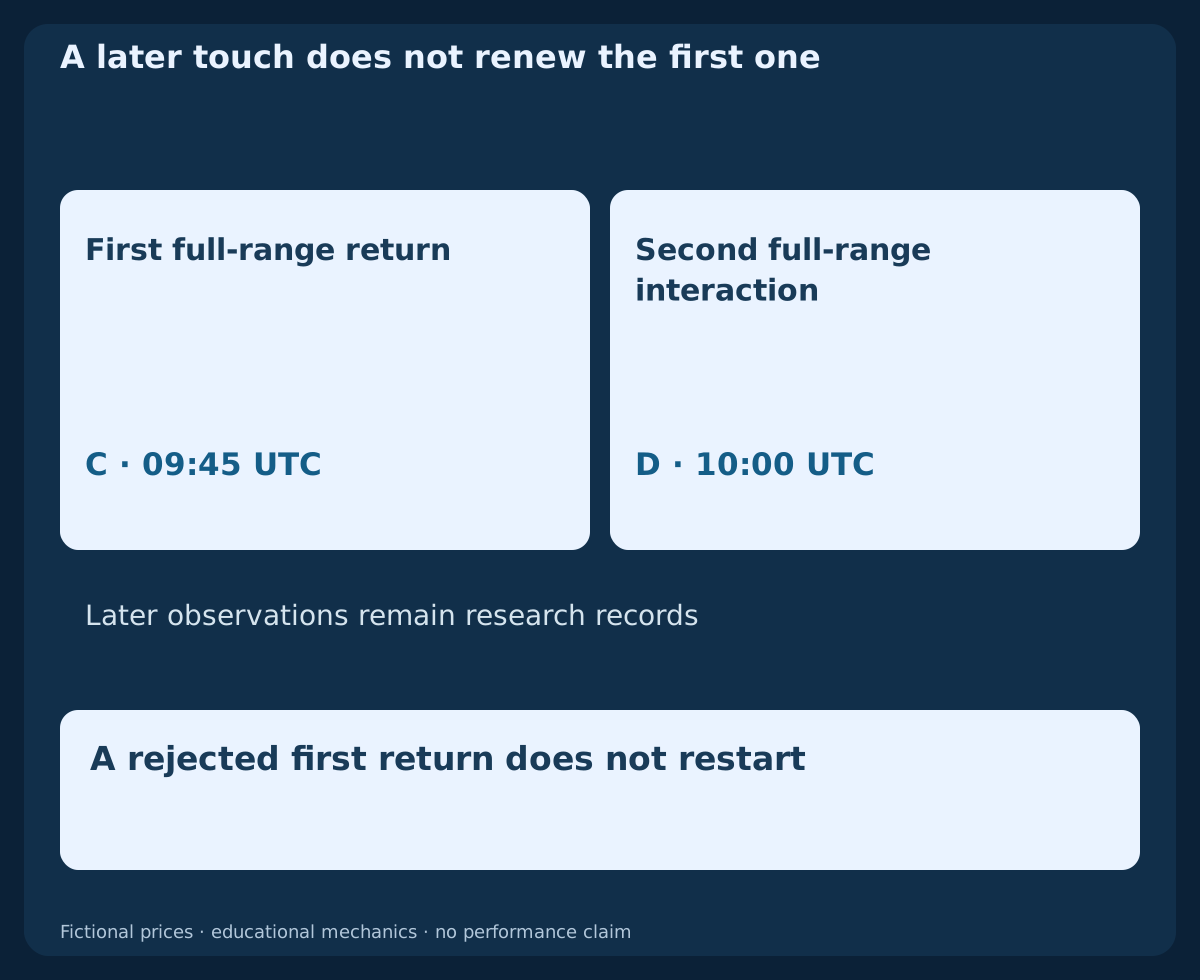
Inspect only completed bars after recognition. Touching an edge counts as a return when the bar's high-low interval overlaps the zone; do not infer a traded path across a gap. In C, which closes at 09:45 UTC, Low(C)=1.20500 reaches the full zone's upper edge at 1.20520, while remaining above the body edge at 1.20480. C is therefore the first later full-range return, while the body-only zone remains untouched.
D closes at 10:00 UTC with Low(D)=1.20460. It supplies the first body-only return and a second full-range interaction. A study that changes the zone boundary also changes which bar counts as the first return. Keep those calendars separate rather than presenting D as the first full-range test.
7. Measure penetration without moving the original edges
C penetrates 2 pip below the full zone's upper edge. D penetrates 6 pip of the full 12 pip interval, reaching 50% of that width. Under the body convention, the same D low penetrates only 2 pip of 6 pip, or 1/3 of its width.
These figures describe visited prices in completed Bid bars. They do not report how much institutional inventory was filled, whether a broker executed an order, or how much protective risk remains. If a model updates a remaining sub-zone after each visit, that is a dynamic boundary rule; retain the original interval as well.
8. Keep first-return consumption separate from the research log
Some complete strategies allow only the first eligible return; others explicitly permit repeated tests. Neither policy follows automatically from an order-block label. If a first-return-only method rejects C, a later attractive D cannot renew the same full-range opportunity.
The later bars in this guide remain in the observation record so that boundary and failure conventions can be compared. Their presence is not permission to keep entering. An assertion that every retest weakens a zone is a testable hypothesis, not a conclusion supplied by these eight fictional bars. Count repeated observations without treating them as independent new formations.
9. Distinguish a wick breach from a closing failure
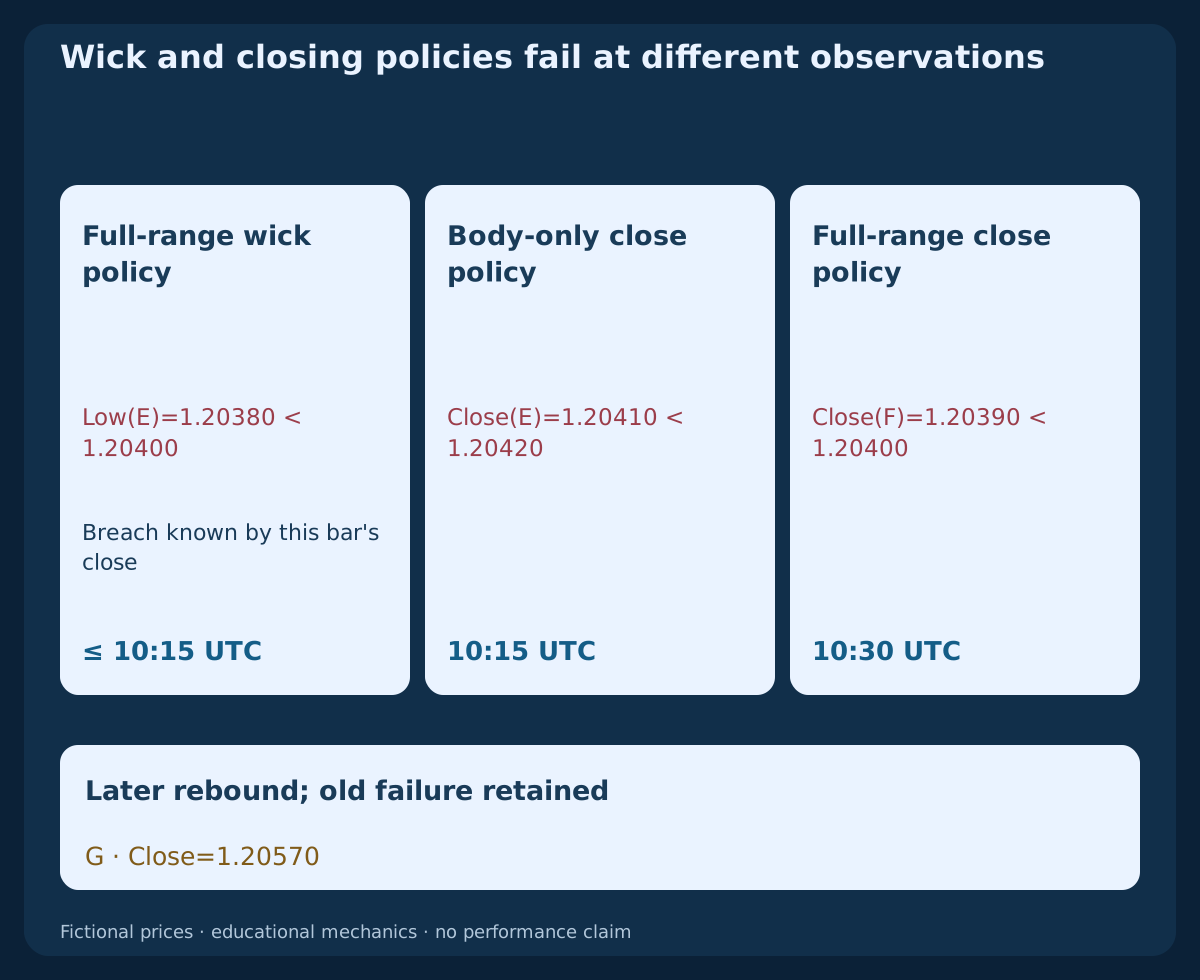
E closes at 10:15 UTC after reaching Low(E)=1.20380 and finishing at Close(E)=1.20410. A full-range policy that fails on a strict low below 1.20400 has been breached by that bar's close. A full-range close-below policy has not: E closes back inside its original interval. The body-only close-below policy does fail because 1.20410<1.20420.
F closes at 10:30 UTC with Close(F)=1.20390<1.20400, invalidating the full-range close-based hypothesis. The M15 low does not reveal the exact intrabar time of E's wick breach. Equality is not a failure under these strict inequalities. A later rally in G cannot restore a zone already rejected under its chosen policy.
10. Declare expiry and deal with missing observations
Age limits and failure conditions answer different questions. As a separate expiry illustration, a model with an inclusive deadline of 10:00 UTC could still observe D at that close, while E would be too late. This hypothetical deadline is not applied to the eight-bar failure record above; combining the two records would change its states.
A gap in timestamps or missing price-side data prevents some conclusions about whether an earlier interaction occurred. Do not invent intermediate candles, call an unknown visit the first visit, or carry a stale first-return permission across a data gap. Specify continuity, session and expiry handling before evaluating returns.
11. A Bid touch is not an Ask-side execution report
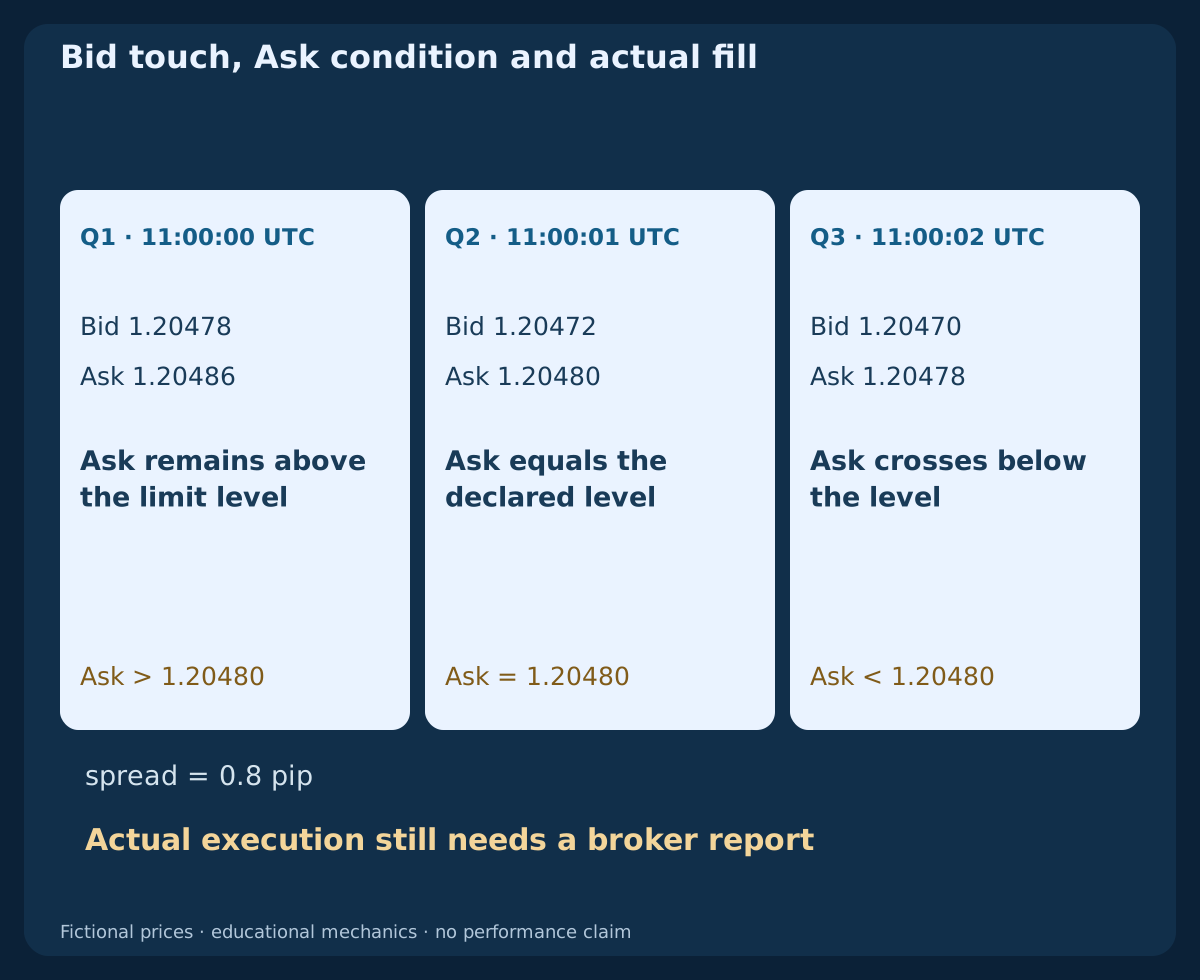
A separate quote-only illustration uses Bid=1.20478; Ask=1.20486, a spread of 0.8 pip. Bid has reached the body edge at 1.20480, while Ask remains above it. That Bid touch alone does not establish the price condition for a resting Buy Limit at that edge.
The next supplied independent quote has Bid=1.20472; Ask=1.20480; the third has Bid=1.20470; Ask=1.20478. Ask equality or crossing can satisfy a declared price condition if a valid order is already resting, but an actual fill still requires broker evidence. These quotes are independent of the M15 fixture and do not revive its failed zone. MT4 history candles use Bid; BUY opens on Ask and exits on Bid, while SELL opens on Bid and exits on Ask.
12. Compare stop conventions at the same assumed fill
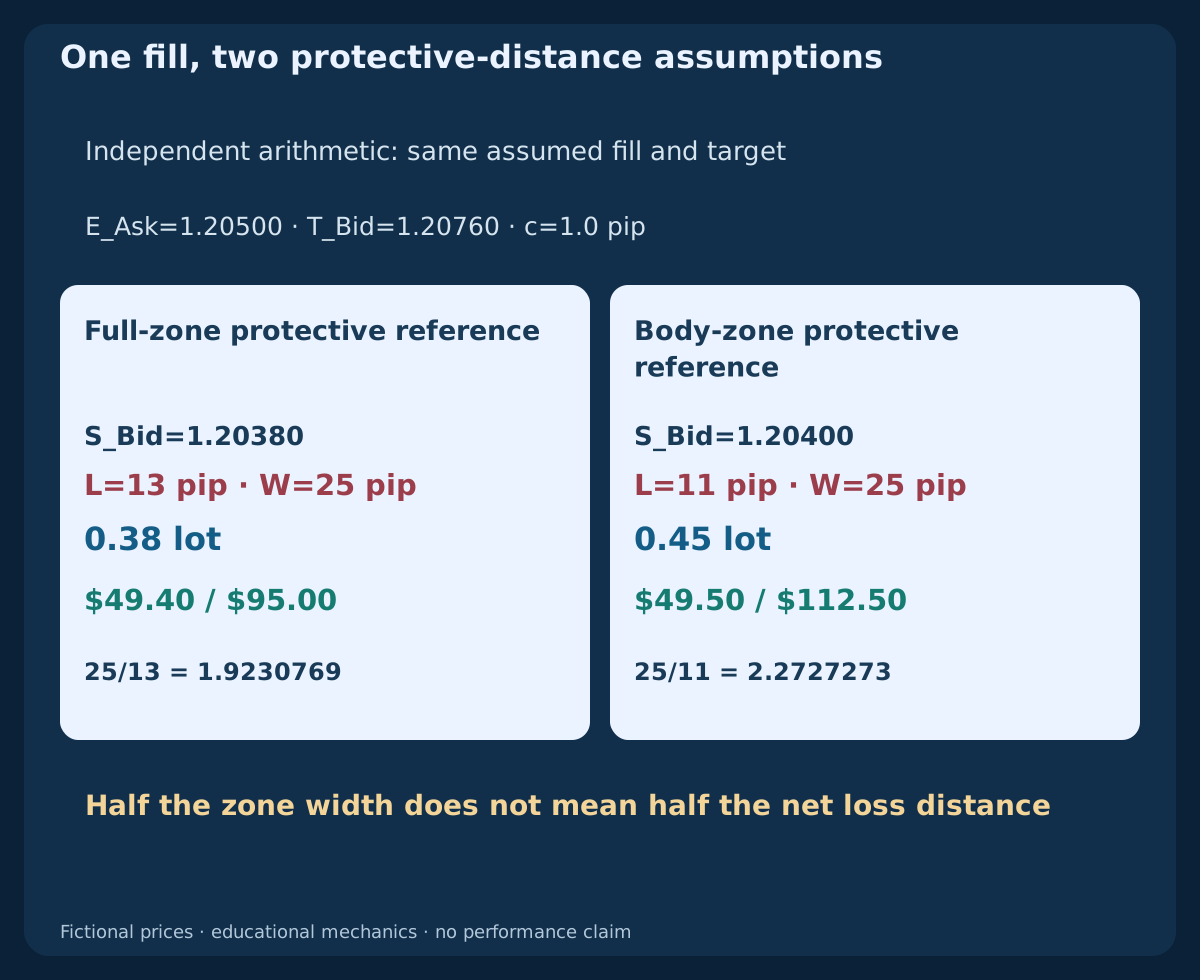
Use an independent arithmetic comparison with entry Ask=1.20500; target Bid=1.20760. A protective level two pips below the full lower edge is stop Bid=1.20380; two pips below the body lower edge gives stop Bid=1.20400. The raw loss distances are 12 pip and 10 pip, while the same target is 26 pip away. No entry or outcome is generated by the earlier bars.
Assume 0.3 pip of worse-exit allowance plus 0.7 pip of linear round-trip commission: c=1.0 pip. Planned net losses are L_full=12+c=13 and L_body=10+c=11; planned net reward is W=26−c=25. The respective reward/risk ratios are 25/13=1.9230769 and 25/11=2.2727273. Proper entry/exit sides already include the spread effect; do not add it again. The allowance does not cap real slippage or gaps.
13. Size account risk rather than the coloured rectangle
For the declared EURUSD contract, pip=0.0001; point=tick=0.00001; contract=EUR100,000/lot; account=USD, giving $10/pip/lot. With equity=$10,000; risk=0.5%; budget=$50; step=0.01 lot, the full-stop case gives floor_step(50/(13×10),0.01)=0.38 lot. Its planned net loss is $49.40 and planned net target is $95.00.
The body-stop case gives floor_step(50/(11×10),0.01)=0.45 lot, with planned net loss $49.50 and planned net target $112.50. The zone width halved, but the net account-risk distance changed from 13 pip to 11 pip. These calculations assume compatible lot limits, adequate margin, accepted protective levels and the stated linear costs. Narrower shading is not proof of a safer or more profitable trade.
14. Mirror direction while preserving the correct price side
A bearish convention can select a bullish source before a declared downward break. If the zone is defined from Bid candles, a return from below can be observed when Bid high reaches its lower edge. A close-based bearish failure can instead require a completed Bid close above its upper edge. Specify strictness, equality and recognition timing for that direction too.
SELL protection and closure use Ask, so a Bid-only source chart cannot independently establish whether an Ask-side protective level was hit. Do not create historical Ask highs by adding the closing spread to a Bid high. Different feeds, quote precision and session boundaries can alter the candle source and its geometry; retain the feed and contract in every comparison.
15. Reproduce the observations and retain rejected cases
The first CSV contains eight fictional M15 Bid bars, S through G, with UTC open and close times. It reproduces the two zone widths, different first-return bars and policy-dependent failures. The second contains three independent paired quotes for the price-side illustration. Neither file contains orders, historical returns or a measured trading edge.
Keep source selection, original boundaries, recognition time, first-touch identity, repeated-touch count, failure policy and any expiry in distinct fields. Add accepted requests and actual fills only when those reports exist. Retain untouched, rejected and failed zones alongside attractive rebounds, and preserve the missing-data flag rather than converting unknown cases into wins.
Download the eight fictional M15 Bid bars (CSV)
Download the independent paired-quote observations (CSV)
| Bar | Open UTC | Close UTC | Open | High | Low | Close |
|---|---|---|---|---|---|---|
| S | 08:45 | 09:00 | 1.20480 | 1.20520 | 1.20400 | 1.20420 |
| A | 09:00 | 09:15 | 1.20420 | 1.20560 | 1.20410 | 1.20540 |
| B | 09:15 | 09:30 | 1.20540 | 1.20680 | 1.20510 | 1.20650 |
| C | 09:30 | 09:45 | 1.20650 | 1.20670 | 1.20500 | 1.20580 |
| D | 09:45 | 10:00 | 1.20580 | 1.20600 | 1.20460 | 1.20510 |
| E | 10:00 | 10:15 | 1.20510 | 1.20530 | 1.20380 | 1.20410 |
| F | 10:15 | 10:30 | 1.20410 | 1.20450 | 1.20350 | 1.20390 |
| G | 10:30 | 10:45 | 1.20390 | 1.20600 | 1.20370 | 1.20570 |
16. Test a change against the same original calendar
To compare full-range and body-only definitions fairly, start with the same source-selection dates and price feed. Record how each convention changes first-return timing, exclusions, protective distances and costs. Comparing only the winning fills that survive each filter hides different denominators and cannot isolate the effect of a boundary change.
Freeze definitions before testing, reserve later chronological periods and examine sensitivity to modest changes. A complete strategy still needs its own entry permission, exits, exposure limits and uncertain-execution handling. The existing Order Block strategy supplies one separate H1 specification; this guide supplies the vocabulary, chronology and reproducible comparisons needed to judge such rules.
Frequently asked questions
Which candle is an order block?
There is no single universal detector. A method must define the opposing source candle or cluster, the later qualifying move and the time at which both become known. The classification does not authenticate institutional orders.
Should I use the candle body or its wicks?
They are different declared conventions. In this fixture the full interval is twelve pips wide and first returns in C, while the six-pip body interval first returns in D. Choose the convention before studying outcomes.
Was the zone tradable when the source candle closed?
Not under this illustration's recognition rule. The source closes at 09:00 UTC, but B supplies the completed reference break only at 09:30 UTC. Drawing the rectangle backwards does not move that observation time.
Does every retest make an order block weaker?
That is a hypothesis to test on an appropriate sample. A first-return-only rule must still consume its first eligible opportunity, including rejected cases. A later return cannot silently restart that permission.
Does a wick through the edge invalidate the zone?
Only under a predeclared wick-based policy. A closing policy can retain a zone after a wick excursion, while an actual protective order might already have been triggered. Zone classification and broker execution require separate evidence.
Are an order block and a fair value gap the same thing?
No. A source-candle interval and a three-candle non-overlap have different geometry and recognition inputs. They may overlap or come from one move, but their labels alone do not supply independent confirmations or guaranteed fills.
Sources and research notes
The candle and failure conventions in this guide are explicitly declared educational choices. Broker documentation establishes quote-side mechanics, not the profitability of an order-block method.
- CMC Markets: order-block conventions and limitations
- MetaTrader 4: order types, Bid/Ask and protective triggers
Educational price-action guide. Fictional bars, independent quotes and assumed-fill arithmetic; no actual orders, historical backtest or measured profitability.