

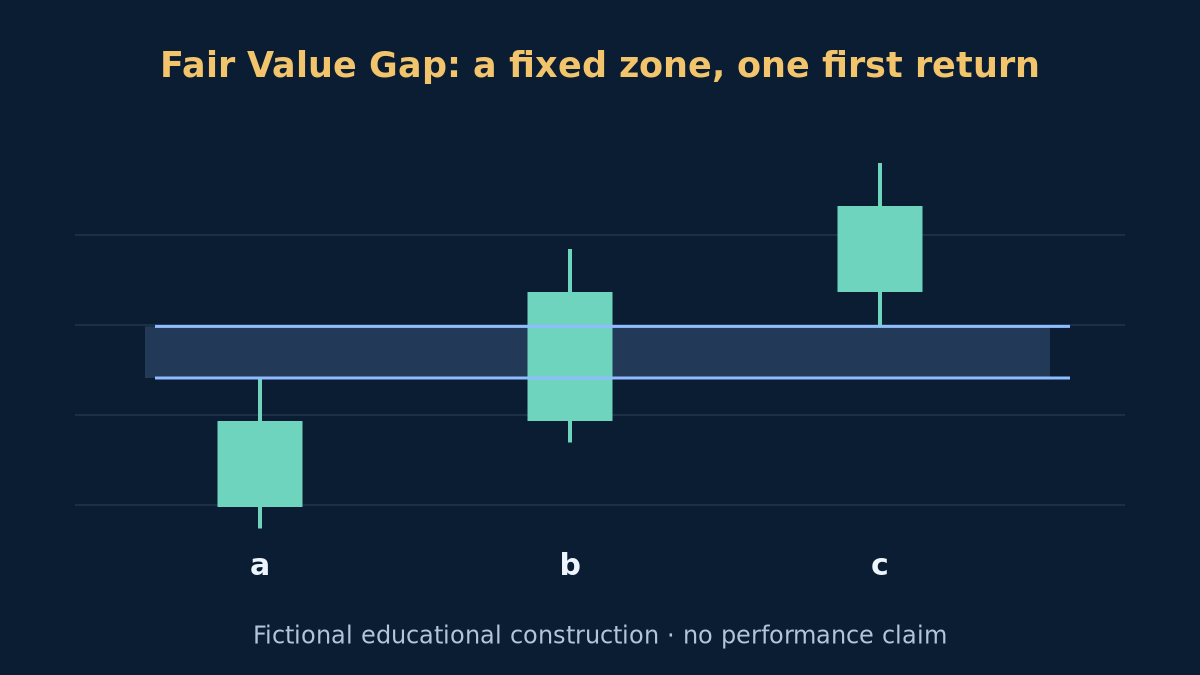
A Fair Value Gap, or FVG, needs an operational definition before it can be tested. A shaded chart area does not explain who traded, prove missing liquidity or establish a profitable return pattern. Here a completed three-candle formation creates a fixed price zone; only its first later return may qualify for a trade. The candlestick-chart guide explains OHLC and quote sides. The thresholds below are declared research choices, not proven settings or a current trade recommendation.
1. Separate a three-candle condition from an actual gap
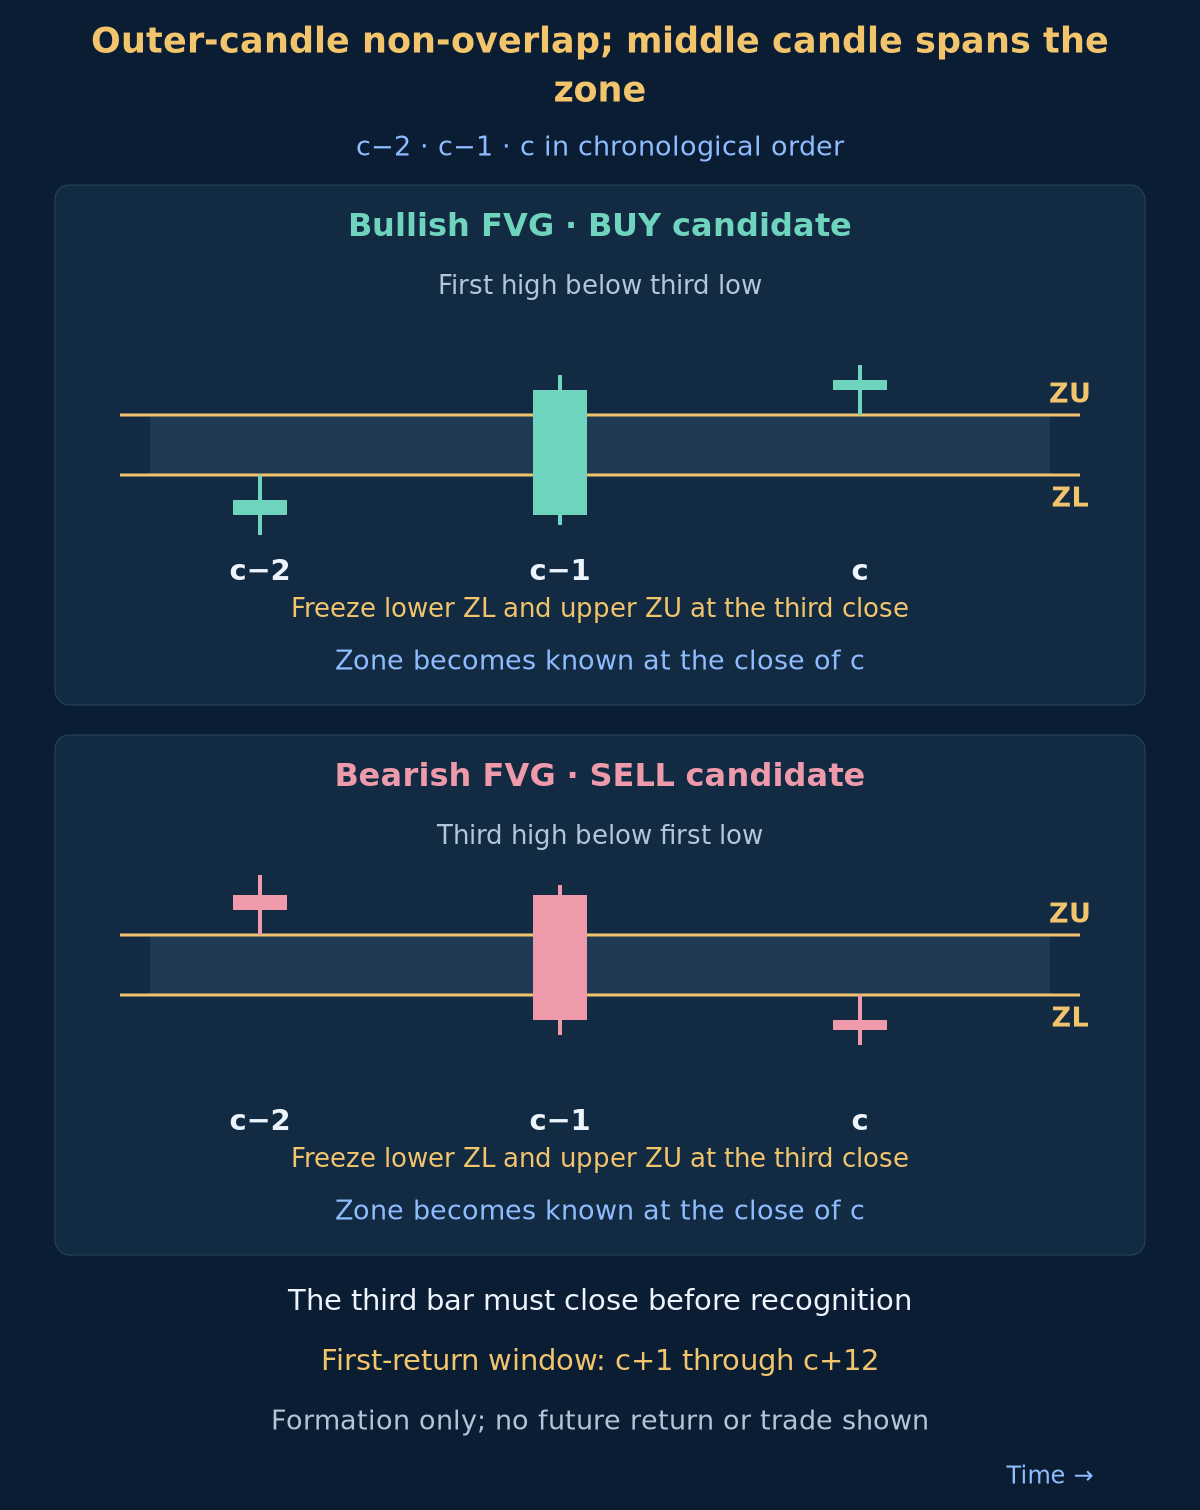
For a bullish FVG, the third candle's low is strictly above the first candle's high; the bearish case reverses that relationship. The middle candle can trade through the entire interval. Therefore OHLC non-overlap between the outer candles is not evidence that the interval contained no quotes or transactions. Nor does it reveal bank orders, measure fundamental fair value or oblige price to return. Our hypothesis is narrower: a first return followed by a specified closing rejection may be worth testing as a continuation entry.
Use ordinary EURUSD H1 Bid bars from one declared feed and corresponding historical Bid/Ask quotes for execution. Pip size is 0.0001 in this specification. Indices increase forward in time; O, H, L and C denote open, high, low and close. Recognition uses completed bars only. MT4 timeseries shifts run the other way: shift 0 is unfinished and shift 1 is the latest completed bar. Convert indexing explicitly before using the formulas.
Require consecutive hourly timestamps from c−2 through formation and the active waiting window. A timestamp gap, including a weekend gap, cancels the candidate; do not carry a stale zone into the reopened market. A fresh formation needs all required observations after the gap. Record the feed, server timezone, contract and exclusions. Missing data must remain missing. A three-candle FVG can exist without a missing hourly candle; conversely, a missing candle is not an FVG signal. Historical Bid/Ask quotes remain necessary for execution and Ask-side checks.
2. Recognise the zone only after the third close
Let c be the third bar of the most recent completed three-bar window. For BUY require L[c] strictly greater than H[c−2]; set lower edge ZL = H[c−2] and upper edge ZU = L[c]. For SELL require H[c] strictly less than L[c−2]; set ZL = H[c] and ZU = L[c−2]. Equality creates no zone. Both bounds are Bid-chart prices. Require width ZU−ZL from 4 to 30 pips inclusive. A newly forming third candle cannot establish either a valid zone or a historical entry.
The middle candle c−1 must have a positive high-to-low range. Require an absolute body of at least 20 pips and at least 0.60 of that range, both inclusive. BUY requires C[c−1] greater than O[c−1] and strictly above H[c−2] plus 2 pips; SELL requires C[c−1] below O[c−1] and strictly below L[c−2] minus 2 pips. These filters define displacement for this experiment. They do not measure order flow or certify institutional activity.
Also require C[c] strictly above ZU for BUY or strictly below ZL for SELL, so the third close is on the intended approach side. At that close freeze the zone, its direction and identity c. No swing pivot or future bar is needed to recognise it. The BOS/CHoCH guide and liquidity-sweep guide describe different conditions. Neither a structure break nor a sweep is an unstated additional filter here.
3. Keep one candidate and an unchanging boundary
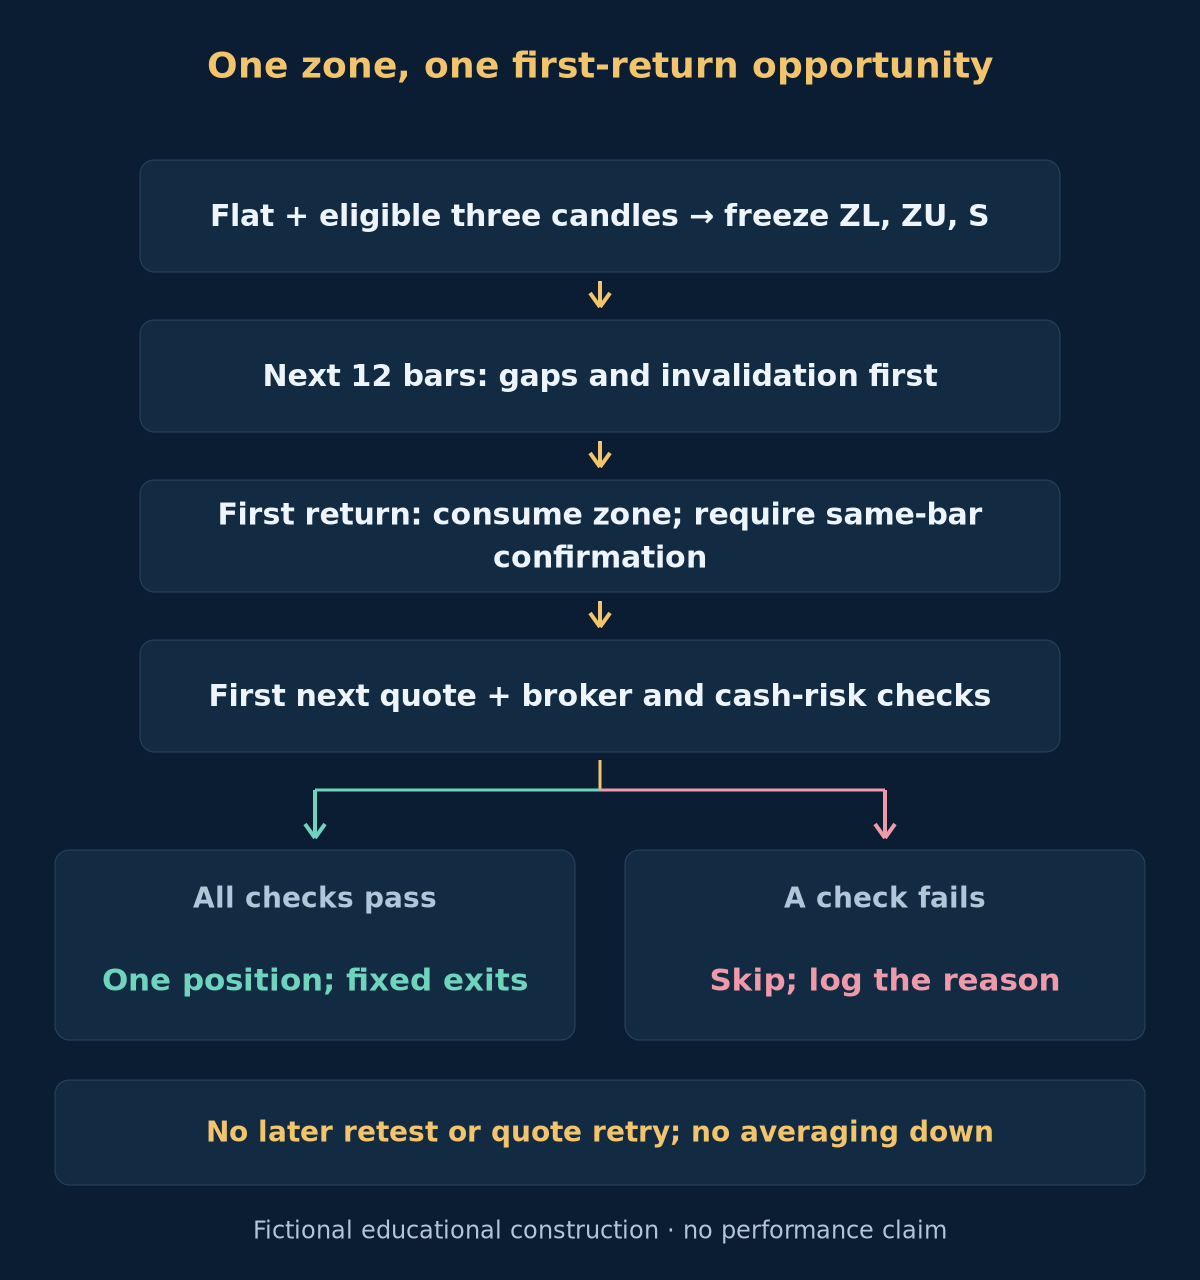
At a bar close, create a candidate only if this rule was flat and had no active candidate at the start of that bar. If a candidate was active, process it first and ignore new formations on that bar, even when it expires, fails or signals. During an open position, do not arm or queue new zones. After the position closes, wait until a subsequent completed bar to inspect a fresh window. This priority avoids choosing a later, prettier zone over an inconvenient earlier one.
Keep ZL and ZU unchanged. Do not shrink the zone after partial penetration, combine overlapping zones, select a midpoint entry or promote an old ignored zone. BUY's fixed protective reference S is ZL minus 2 pips; SELL's is ZU plus 2 pips. These are price references, not guaranteed fills. An older zone cannot be revived after cancellation. A later candidate must have its own newly completed third bar and must satisfy the full formation rules.
4. Define expiry and what counts as the first return
Only bars c+1 through c+12 inclusive can provide a return; c cannot. On each completed waiting bar, cancel first for a timestamp gap, a BUY Bid low at or below S, or a SELL Ask high at or above S. Invalidation wins over an otherwise attractive close on the same bar. If no return occurs by the close of c+12, expire the zone. The return on c+12 is allowed if every other condition passes; c+13 is too late.
The first BUY return is the earliest eligible bar whose Bid low is at or below ZU. The first SELL return is the earliest whose Bid high is at or above ZL. Equality counts as a return. Mark the zone used on this first return, regardless of whether the next confirmation checks succeed. A bar that opens within or jumps across the zone is not saved for another attempt. This rule can reject a full-zone penetration that reaches S; it does not treat a completed fill of the shaded band as an automatic trade.
5. BUY: the first return must confirm on the same bar
After the cancellation checks, the first BUY return bar t must have opening Bid O[t] strictly above ZU, a bullish body C[t] greater than O[t], and closing Bid C[t] strictly above ZU plus 2 pips. Its low must remain strictly above S. Define the fixed confirmation gate G = ZU plus 2 pips. A close equal to G or a wick above G is insufficient. If any condition fails, the used zone ends without an entry. Do not wait for a second confirming candle or a later return.
Inspect only the first Bid/Ask quote after the signal closes. It must arrive within 60 seconds; live Bid must remain strictly above G, spread must be no more than 1.5 pips, and Ask minus the signal Bid close must be no more than 5 pips. A lower Ask is acceptable if all other checks pass. A late, missing, expensive or invalid quote means skip and record the reason. No later quote, second close or return to the broken boundary revives the same sequence.
6. SELL: mirror recognition, not the execution side
The first SELL return bar t must open with Bid O[t] strictly below ZL, have C[t] strictly below O[t], and close with Bid C[t] strictly below ZL minus 2 pips. Its Ask high must remain strictly below S. The fixed gate G is ZL minus 2 pips. Consume a failed first return without waiting for another candle. At the first subsequent quote within 60 seconds, live Bid remains strictly below G, spread is at most 1.5 pips and signal close minus Bid at most 5 pips. A better Bid can pass while below G; a failed first quote ends the opportunity.
SELL opens at Bid and closes at Ask; BUY opens at Ask and closes at Bid. Zone recognition and the return trigger use the Bid bars, while SELL protection and pre-entry invalidation need historical Ask highs. These are intentionally different tests. Do not approximate a historical Ask high by adding the closing spread to the Bid high. Without the required data the case is unverifiable. This rule has no limit order inside the zone and does not trade its opposite-direction failure; the broader breakout strategy is a separate specification.
7. Check feasibility before and after the fill
At the available entry quote, require a positive distance to S between 8 and 60 pips inclusive. Check price-tick alignment, minimum and maximum volume, lot step, margin, trading permissions, commissions and broker stop restrictions. Unknown or failed constraints mean skip; do not move S to fit the broker. A reported zero minimum stop distance does not guarantee every stop request will be accepted. An entry signal and an order request are not evidence of an actual fill.
Size using that quote and the stated costs. Record the actual fill E, keep S unchanged and recheck the distance and cash budget using E. If the fill breaches the limits, or protection cannot be established, request an immediate close at an available quote and retain the trade, costs and reason in the results. Do not reclassify a filled failure as a skip. Delays, rejected orders and emergency closes are part of execution risk, even when the pattern itself was recognised correctly.
8. Use fixed exits and size in the account currency
For BUY, price risk is E−S and target T is E plus twice that distance. For SELL, risk is S−E and T is E minus twice that distance. The target uses actual entry-to-stop distance, not the FVG width, midpoint or a promise to fill another zone. BUY exits use Bid; SELL exits use Ask. Keep S and T fixed, without trailing or break-even changes. If neither is reached, request an exit after 12 completed H1 bars, counting the entry-containing bar as the first, at the first subsequent real quote.
Use an illustrative budget of 0.5% of current equity and at most one open position for this rule set. Divide the cash budget by estimated loss per lot, including price distance, round-trip commission and the total adverse-slippage allowance. Round down to the permitted lot step; below minimum volume means skip. An allowance is not a maximum-loss guarantee. Gaps and execution failures can exceed it. Assess combined exposure with other systems separately using the risk-management guide.
Pips, platform points and minimum ticks are different units. Use the actual contract and account currency for pip or tick money values, converting distance and tick size into matching price units. A value given in points must be converted before combining it with a price distance. USD 10 per pip is not universal. Correct Ask/Bid entries and exits already include spread; do not add the same spread twice. Include swaps when applicable. The pip guide and position-sizing guide cover these conversions.
9. Worked BUY: formation, first return and actual fill
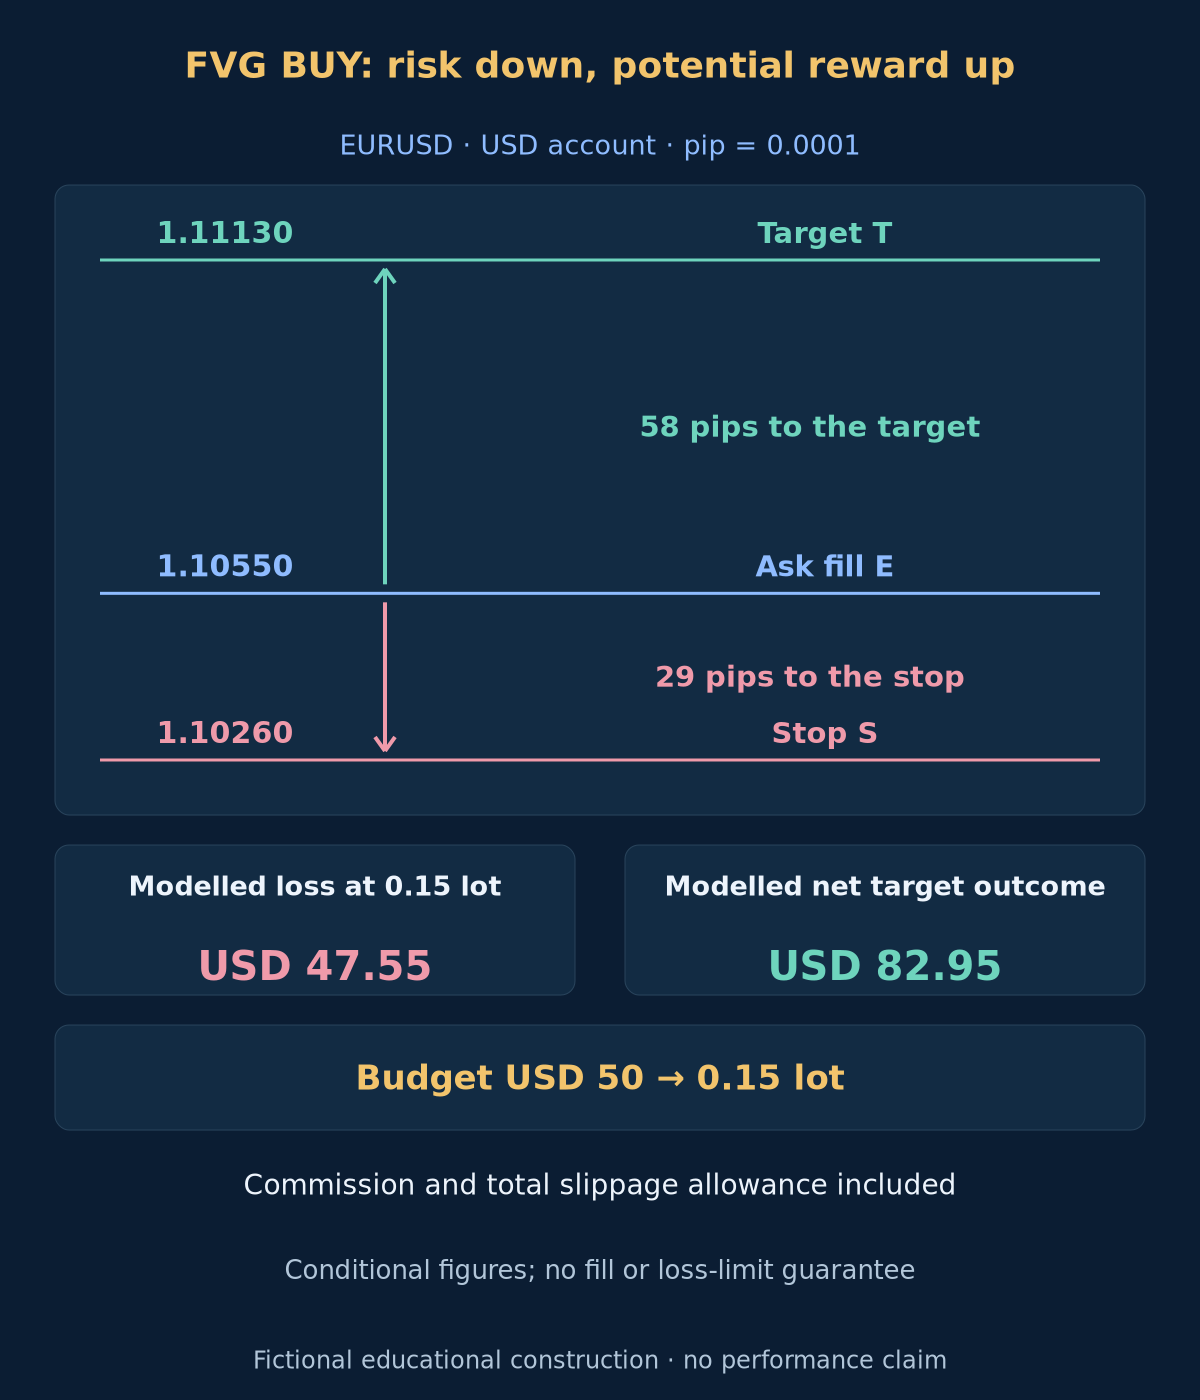
The fictional formation ends at c = 22. Bar 20 has high 1.10280. Middle bar 21 opens at 1.10200, has low 1.10180 and high 1.10480, and closes at 1.10450. Its 25-pip body is more than 0.60 of its 30-pip range and closes above the required first-high buffer. Bar 22 has low 1.10400 and closes at 1.10470. The fixed zone is ZL = 1.10280 to ZU = 1.10400, width 12 pips. The middle candle spans the zone; no empty transaction interval is being asserted.
Bar 23 has Bid low 1.10420 and close 1.10460, so no return yet. At the first return t = 24, opening Bid is 1.10460, low 1.10340, high 1.10560 and close 1.10530. The low enters the zone but stays above S = 1.10260; the bullish bar closes strictly above G = 1.10420. The first quote arrives 2 seconds later at Bid 1.10540 and Ask 1.10550: spread 1 pip and adverse chase 2 pips. Assume accepted protection and actual fill E = 1.10550. The signal close itself was not an executable historical entry.
The fixed stop is 29 pips below E; T = 1.11130 is 58 pips above it. In a USD 10000 account, the 0.5% budget is USD 50. Assume USD 10 per pip per 1 lot, USD 7 round-trip commission per lot and a total adverse-slippage allowance of 2 pips per alternative outcome. Modelled loss per lot is USD 317. Rounding down to a 0.01 lot step gives 0.15 lot and modelled loss USD 47.55. Rounding upward would exceed the budget.
| Calculation | Declared value | Meaning |
|---|---|---|
| Signal gate G | 1.10420 | Upper zone edge plus closing buffer |
| Fixed stop S | 1.10260 | Lower zone edge minus protective buffer |
| Price target T | 1.11130 | Twice actual entry-to-stop distance |
| Cash budget | USD 50 | Equity multiplied by the risk fraction |
| Modelled loss per lot | USD 317 | Price distance plus commission and allowance |
| Rounded volume | 0.15 lot | Round down; never round risk upward |
| Modelled loss | USD 47.55 | Conditional allowance, not a loss cap |
| Modelled net target outcome | USD 82.95 | Conditional result, not a forecast |
At T, gross price gain is USD 87.00. Deduct USD 1.05 commission and USD 3.00 slippage allowance for a modelled net target outcome of USD 82.95. The allowance is used once in each alternative outcome, not twice inside one trade. The price-distance ratio is 2, while the net cash ratio is lower. This example assumes no swap and no further fill deviation. Neither the target nor the stop is a guaranteed execution price, and the calculations are not a return forecast.
10. Test the sequence and retain every rejection
Replay bars and quotes in chronological order. Store the three formation times, c, direction, middle-body and range tests, frozen ZL/ZU/S, expiry, first-return time, cancellation or failed-confirmation reason, signal close, first subsequent quote, order request, actual fill, volume, costs and exit. Record ignored formations as well, so priority can be reproduced. A final chart cannot show which zones were available or already used. The optional equations are a concise reference, not a complete EA or order-management program.
Retain failed formations, invalidated and expired candidates, failed first returns, bad quotes and broker constraints. None can be removed because a later retest won. Use historical Bid/Ask quotes to order stop and target events. If both exits appear inside one OHLC bar and the order is unknown, mark ambiguity and report a separate conservative stop-first sensitivity result; never choose the favourable sequence. A zone cancelled before entry is not a filled losing trade. Report those populations separately.
Freeze the specification before evaluating untouched periods. Report all tested parameter variants, candidate counts, rejections, quote failures, emergency closes and completed trades, together with net expectancy, drawdown, turnover and sample uncertainty. Test nearby tolerances and different feeds without retaining only winners. The backtesting guide and execution-cost guide explain related limitations. No performance study or demonstrated advantage is supplied here.
Common errors are marking a zone before c closes, calling the middle candle's traded range an empty market, moving boundaries after penetration, using a second retest after the first fails, ignoring Ask-side invalidation, buying at a past close and retrying a failed first quote. A zone may never be revisited, may fail on first contact or may signal before an adverse execution. Gaps, news and correlated positions can exceed a small nominal budget. An attractive FVG diagram and a target twice the stop do not establish profitability.
Optional: exact zone, return and sizing equations
buy_zone: ZL = H[c-2]; ZU = L[c]; require L[c] > H[c-2]
sell_zone: ZL = H[c]; ZU = L[c-2]; require H[c] < L[c-2]
4*pip <= ZU-ZL <= 30*pip
body = abs(C[c-1]-O[c-1]); range = H[c-1]-L[c-1]; body >= 20*pip and body >= 0.60*range
zone_known_at = close_time[c]; eligible_return_bars = [c+1, c+12]
buy_first_return: L_Bid[t] <= ZU; sell_first_return: H_Bid[t] >= ZL
buy_confirm: O[t] > ZU and C[t] > O[t] and C[t] > ZU+2*pip and L_Bid[t] > S
buy_stop = ZL-2*pip; sell_stop = ZU+2*pip
buy_target = E + 2*(E-S); sell_target = E - 2*(S-E)
cash_budget = equity * 0.005
loss_per_lot = stop_pips * pip_value_per_lot + commission_per_lot + slippage_pips * pip_value_per_lot
lots = floor((cash_budget / loss_per_lot) / lot_step) * lot_step
11. Questions about the Fair Value Gap strategy
Does an FVG prove that no trading occurred inside it?
No. This detector compares the first and third bars. The middle candle may span the whole shaded interval, and OHLC alone cannot reconstruct its transaction sequence or participants. The phrase Fair Value Gap is a chart label here, not an estimate of fundamental value or proof of unfilled institutional orders.
Must price fill the whole zone before an entry?
No. The first return starts at the near edge. Its own bar must pass the opening, stop-side and closing conditions. Partial penetration can qualify, while full penetration to the stop reference cancels the candidate. No midpoint or touch-only order is assumed; the next executable quote still has to pass every cost and risk check.
Can a second retest rescue a failed first return?
No. The first return consumes the candidate even when confirmation fails. This makes the rule reproducible rather than letting the chart select a later winner. A new opportunity requires a newly completed eligible formation under the declared priority; it does not reuse a historical ignored or failed zone.
Is this an Order Block or Breaker Block strategy?
No. This formation uses non-overlap between two outer candles and a defined middle displacement. An Order Block needs its own rule for creating a source-candle zone; a Breaker Block also needs a prior zone and its subsequent failure. Similar shaded areas do not make those detectors interchangeable. This article supplies no performance validation for any of them.
12. Primary sources and declared scope
Primary references: FXOpen's practitioner description of three-candle FVG bounds and the absence of a guaranteed return; MetaQuotes on timeseries indexing, symbol, tick and volume properties, and market-order prices and stop restrictions. Checked 2026-10-19. We use the geometric label without inferring unseen orders or absent transactions. The filters, expiry, first-return confirmation, execution policy and worked example are our educational construction, not settings prescribed or validated by these sources.
Forex and leveraged trading involve substantial risk. This article is educational and is not investment advice. Confirmation, stops and cost allowances do not guarantee fills, limited losses or profit. All prices, diagrams and numerical outcomes here are fictional conditional examples.